![Logo cyan rot quer.png]](https://help.releva.nz/hs-fs/hubfs/Logo%20cyan%20rot%20quer.png?height=35&name=Logo%20cyan%20rot%20quer.png)
This guide walks you through the setup of our plugin in your PlentyONE system step by step.
If you do not have a RELEVANZ account yet, please register first: REGISTER FOR FREE
Install the Plugin via the PlentyMarketplace
First, you need to get the plugin from the PlentyONE Marketplace and activate it in your system.
- Get the plugin: Go to the PlentyONE Marketplace and add our plugin. You can find it directly here: RELEVANZ Plugin in the Marketplace. The process will take you through checkout, but the plugin is free of charge.
- Add it to the plugin set: In your PlentyONE backend, navigate to
Plugins -> Plugin set overview. Select the desired plugin set and click "Add plugin". - Activate and deploy: Find the RELEVANZ plugin in the list, select the latest version and install it. Then activate the plugin in the set and deploy the plugin set.
- Check the installation: After successful deployment, you will find a new RELEVANZ entry in the main menu.
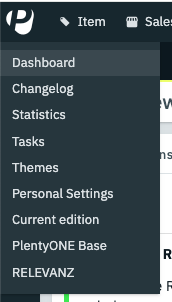
Configure the Plugin
After installation, connect the plugin to your RELEVANZ account using your personal API key.
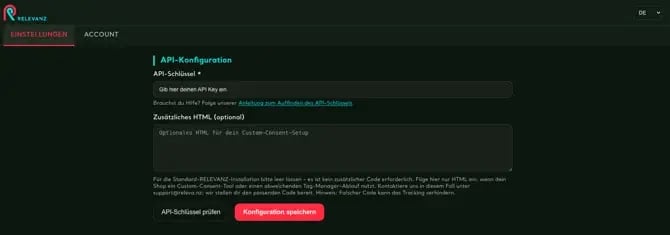
- Open the settings: Click the new RELEVANZ menu item to open the plugin settings.
- Enter your API key: Enter your API key in the designated field and save the configuration. You can find instructions on where to locate your API key here: Where can I find the API key?
- Confirmation: The system automatically validates the key and immediately lets you know whether the connection was successful. The basic configuration is now complete.
Note on cookie consent tools: If you use PlentyONE's standard cookie consent tool, no additional steps are required. If you use a custom consent tool, additional code may be required. In this case, simply contact us at support@releva.nz and we will be happy to assist you.
Set Up the Catalog
A catalog must be configured to transfer your product data.
- Navigate to
Data -> Catalogsand click the plus icon to create a new catalog. - Complete the fields as follows:
- Catalog name: Any name, e.g. "RELEVANZ"
- Marketplace: RELEVANZ
- Export type: Item (New)
- Category: RELEVANZ
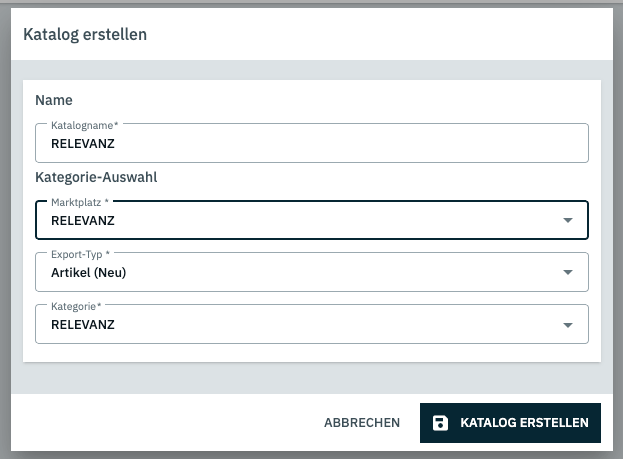
- Click CREATE CATALOG.
- Now assign the data sources to the corresponding fields. For the integration to work correctly, at least all required fields must be configured.
- Below you will find an example configuration along with explanations of the individual fields:
| Field | Data source | Comment |
|---|---|---|
| Item ID | Item ID | |
| Variation ID | Variation ID | |
| GTIN/EAN | GTIN 13 | Depends on the barcode you use. If you use different barcode types, add fallback data sources accordingly. |
| Brand | Manufacturer company name | |
| Category IDs | Category ID | |
| Name | Name 1 | |
| Short description | Preview text | |
| Long description | Item text | |
| Price (gross) | Sales price → Currency: Euro → Sales price: Price | |
| Base price | Base price → Price | |
| Base price unit | Base price → Unit name | |
| Base price quantity | Base price → Quantity | |
| Tax rate | Tax rate | |
| Stock | Virtual total stock → Physical stock | |
| Product URL | Ceres product URL | |
| Image URL |
1. Image → Variation images → Single image → Image information → Full image URL. Add fallback data source: 2. Image → Item images → Single image → Image information → Full image URL |
|
| Last update | Timestamp → Variation updated at |
In our example configuration, we have left out four fields. Since pricing depends on your individual configuration in the PlentyONE system, we cannot provide a general recommendation for these fields.
Here is an explanation of the additional fields:
| Field | Explanation |
|---|---|
| Sale price (gross) | We use this field to display a crossed-out original price. If this field contains a value that is lower than the regular gross price, the regular price will be displayed with a strikethrough in the ad and the sale price will be highlighted. |
| Price (net) | Used internally only. |
| Sale price (net) | Used internally only. |
| Price from (gross) | For products with variations, you can enter the lowest variation price here. This price will then be used in the ad, for example: "from €4.99". |
Important for multiple shops: If you sell in different countries with different languages or currencies, or if you use multiple clients, you should create a separate catalog for each setup and adjust the relevant fields accordingly, e.g. currency, client and language.
Don't Forget the Final Steps
- Return to the catalog overview (
Data -> Catalogs) and check the "Active" box for your newly created catalog to start the data export.

Finally, open your catalog settings once more.
Click the "Asynchronous download" icon at the top to generate your catalog for the first time. Once it has been created, please send us your catalog URL by email at support@releva.nz

And that's it! The setup is complete. All that's left to do is finish setting up your campaigns in your RELEVANZ account and define your advertising budget – then you're ready to go.